Showing posts with label wire. Show all posts

Monday, 10 February 2014

Metalwork: Making wire.

Wire is a very versatile material in metalwork,  and I have now learnt how to make my own wire the diameter and shape I want it. This means I can make the wire to suit the piece I want to make, rather than changing the piece depending on the wire. I started off with a rod of copper, about 4mm diameter and about 6cm long. I used the rolling mill to roll it down, making the diameter smaller and a slight diamond shape. This also made it longer because the metal was being squashed through the roller.

I then used a draw plate to make the wire thinner, and give it a square cross section. I decided to make it square because wire is generally round, and I thought square would be more interesting because it could be twisted to create different effects.
The end of the wire is a little bit chewed up because of the pliers I used to pull it through the draw plate, so this little bit is unusable, but could be made into something else or put in a scrap pile to melt down later.


Sunday, 6 October 2013

Drawing: Using mixed media.

This weeks session was linked to last weeks, in that we were using last weeks drawings to create these ones. I chose a small section of my shoe mountain drawing, and drew it a lot bigger on a piece of black paper. I then used mixed media (wire, paint, charcoal, chalk, masking tape, wood, fine liner, cutting out, string) to pick out details and make it more 3D.
These are some close-ups of the drawing.


I drew with coloured fine liner on the blocks of wood, as a contrast to the very big black and white marks the rest of the drawing is made of.


I enjoyed doing this and experimenting mixing media I haven't used together before, but I did get very messy.

Monday, 13 May 2013

Wire work with ceramics and textiles

I wanted to include a textile element in one of my ceramic pieces, and also use metal to create a mixed media piece.I decided to use brass wire, and I made the wire frame curved, so as to be a statement necklace. I made the frame so the textile element could be woven through and sewn on to the wire. I used the large ceramic piece as the centre piece, and had two smaller ones on each side. I kept the colour scheme neutral so the ceramic pieces stand out and are the focal point. I pleated and stitched parts of the ribbon to add detail without taking the focus away from the ceramic pieces. I may add further textile parts to it at a later date, but I don't want to make it too busy and spoil the subtlety of it.


Thursday, 17 January 2013

Metalwork: Recycling a cat food can

 I decided to use empty washed out cat-food cans, because we have four cats, so the cans are readily available  and are always just put in the recycling bin, so I wanted to use them to make something new. After looking at leaves, I decided to use the ridges that go around the can for the veins of the leaves. I cut diagonally across the ridges of the can, then cut out the two halves of the leaf. 

I used a punch and a hammer to make holes in either side of the leaf, then used wire to attach them together neatly. I made three leaves in this way, and when they are all put together I think they would make a nice necklace, or brooch.


 Next I used the base of the can, which is thicker than the sides and has circular grooves, and put enamel powder into the centre circle and put it into the enamel kiln.
 When I took it out and it cooled, I made a copper wire flower shape, based on the centre of the pink flower, and put it onto the enamel, then put it back into the kiln to melt the enamel again, so the wire would sink into it and would hold  it firmly. I then used white enamel powder around the wire part, so a little bit of the yellow was still visible through it.

 I wanted to also colour the outer grooves, but not to cover up the whole of the surface, because I wanted it to have the mix of old metal with new enamel. I used white and red enamel because there was no pink, and think it has worked well. I have not used enamel before this, and think my outcome is very successful in showing the mix of old with new, and also making a new object from an old one. This could be used as a decorative object on its own, or could be made into a brooch or necklace.

I then tried to make something from a can base that didn't include using any new materials, so I decided to use some paper clips and a drawing pin, to add to the can as decoration. I think this worked well because all of the materials are shiny metal, and are designed to be functional not decorative so using them in this way is interesting. I have bent the paper clips so they look like the flower petals, and also used shears to cut the edge into petal shapes.

Wednesday, 2 January 2013

Another Vessel

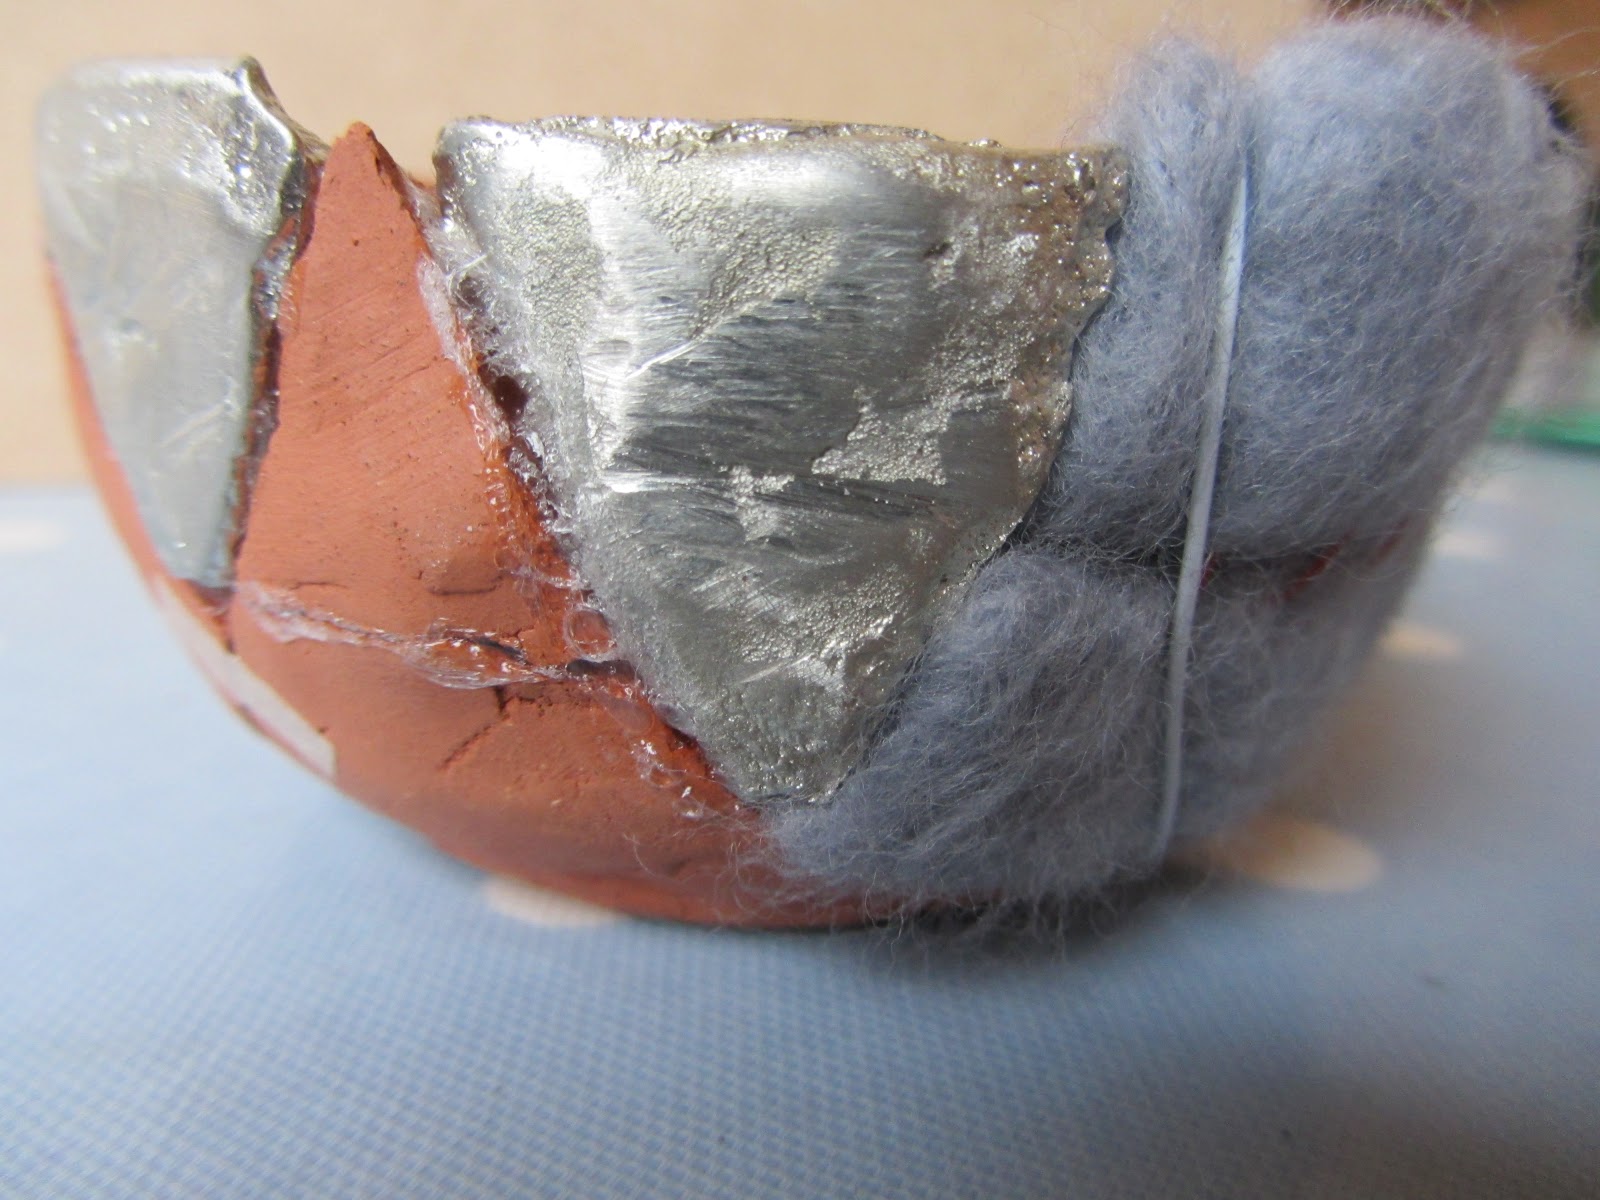
For my next vessel, I wanted it to be mixed media, rather than just metal. I tried to keep with the idea of repairing something, so before I could do that, I had to break something. That 'something' ended up being the pottery bowl I made in the exploratory stage. I decided to drop it onto my kitchen floor, and this broke it into quite large shards. It would have been possible to carefully glue the pieces all together again, without much difficulty, but I wanted to make the repairs more obvious than that, I wanted to use parts that didn't originally come from the pot.

I decided to cast two of the smaller shards in pewter, and used small strips of masking tape to stick two of the larger pottery pieces together. I then only had one other piece, which I decided to make out of felt, because felt is something nobody would use for a vessel, something that would make the bowl useless, so it now has no function except decoration. I used wire to hold the felt piece to the rest of the bowl, and glue to hold in the metal pieces.


For the felt piece, I used merino tops, and needle felted them to make it the same shape as the gap in the bowl. I sewed a piece of wire across the piece so It would keep its curved shape.


The glue was quite difficult to control, and came out of the joins, but instead of taking it off the surface, I decided to leave it, to make it very obvious that this object had been changed, broken and repaired.


Thursday, 27 December 2012

Metalwork: Vessels.

In our skills building phase, we learnt two different ways of making metal vessels, both hand raising and spinning. The first bowl I made was hand raised using a hammer and a stake. I found this quite difficult at first, because the disc of metal was still quite flat and it was hard to get the sides to come inwards without creating pleats or changing the shape of the bowl. I had to anneal the bowl several times while I was hammering it, because working with the metal makes it harder and more difficult to shape. 
 After looking at pottery shards, I started to think about how each of the shards had come from something, a pot or a plate, and I wanted to bring this theme into my metalwork as well as my ceramics. Using a piercing saw, I cut out an angular 'shard' shape from my copper bowl, and flattened it. I could then accurately copy the shape on to a piece of brass, which I reticulated to give it an interesting pattern and texture.
 I sewed this into the gap using wire, drilling small holes in both pieces to thread it though. I think this looks as if the bowl has been reconstructed from the shard, like an archaeologist would do.
I like the interesting idea of having a shard of metal. metal doesnt naturally shatter or crack, because it is malleable it would dent rather than break.

The next bowl I made was on the lathe, which gave it a very smooth surface, and a very regular shape because it was formed onto a block. I was pleased with how the bowl turned out, but I thought it was quite plain, and although I enjoyed the process, the outcome didn't really fit with my theme.
 For this reason, I decided to follow the same idea as my first bowl, but with a process more suited to the material. I first thought of hammering or dropping the bowl, and then trying to mend the bowl in an interesting way, but after some thought (and some encouragement from my metalwork tutor) I let one of my classmates take the bowl, with the instruction 'damage it, but don't destroy it' This was so I couldn't decide how to fix the bowl before I damaged it, as I would not know what the damage would be.
 A few minutes later, my bowl was returned, looking far less shiny and new than it had previously. He had used a micro welder to melt through the sides of the bowl, so there were now gaps in them, and also blobs of metal on the inside.
I did some quick sketches of ideas to decide how to mend the bowl, concentrating on decoration, not function.
 I then decided to hammer the middle part, in between the melted slits, to broaden it so the gaps were not as big. This also flattened the blobs of metal on the inside, some of them even fell off completely.
 I then did some more sketches of repairs I could do to make sure the pieces do not come apart.
I liked the idea of having round or oval bridges across the gaps, riveted in place on both sides, because this would be both decorative and unusual. I cut the ovals out of brass with a piercing saw, reticulated them, and drilled holes in both sides. I then used copper rivets to attach them to the bowl, doing one side of each oval before drilling the second hole in the bowl, so that they definitely lined up when I put the second rivets in.
 The rivets are quite noticeable on top of the brass, and I like the detail they create, which wouldn't be there had I soldered the pieces on. On the inside of the bowl, only a tiny amount of brass is visible through the gaps, and instead of the rivets contrasting the colour of the bowl, they add to the texture of where the copper was melted.
 I used powdered pumice stone and some liquid soap to give the surface a satin finish. I used a toothbrush to apply it, and followed the shape of the bowl where I could, so the brush marks went around the bowl and there were no harsh angular lines.