Showing posts with label leaf. Show all posts

Tuesday, 19 November 2013

Vision: Changing how people see

For our theme of vision, i wanted to take a very everyday item, and change the way people see it or think about it. i decided to use a leaf, because leaves and flowers are one of my favourite things to photograph, because they have details in that people don't notice usually. I decided to make these details obvious to everybody. I chose to look at veins in the leaves.
I first did this by photographing the veins close up to show them very obviously.
I then decided to cut out parts, to make the veins more prominent, because the parts in between are taken out.
I photographed this against the window, to get the light coming through the gaps. This photo also has the cityscape in the background which i really like.

Still life: a modern vanitas

I did a still life based on the Dutch vanitas paintings. these paintings showed wealth, and often showed things like meat, but their aim was to show the passing of time, to give the idea that wealth doesn't last forever and death is inevitable. They show the meaninglessness of earthly belongings. The paintings often showed egg timers or clocks, skulls and bones, and flowers. i wanted to merge this idea with modern life and consumerism, to show both how short life is, and how much people rush nowadays. The traditional vanitas paintings were painted in a very realistic style, so i wanted mine to contrast to this by being a very simple line drawing.
I drew a digital alarm clock, to represent time passing, a chocolate wrapper to show how people don't eat proper meals a lot of the time and instead rely on pre-packaged foods and snacks. I also drew a dead leaf, instead of flowers, because many people do not have gardens any more and the only nature they see is on their way to work. It is autumn at the moment and there are beautiful leaves all over the floor, but nobody stops to appreciate them.

Tuesday, 8 October 2013

Glasswork: using cold glass.

This week in glass we were doing more work using cold glass. I designed and made a tile from two sheets of glass, with copper wire and copper foil inside for the decoration. I wanted to stay with the nature theme so I cut leaves out, and then used the copper wire and small pieces of copper foil to make it look as though it was windy, like the leaves were being blown about.


i washed and dried the glass sheets carefully, so as to not leave any marks on them, because the marks would stay there through the firing.
The tiles were put in the kiln on ceramic fibre paper, and were fired up to 810 degrees, so the glass sheets were fully fused together.

We then filled the moulds we made in the last session. for the half-mould, I filled it up to about twice its depth, because it needs more glass than it looks like it should to make up for the air in between the glass pieces.
these were then put into the kiln to fire, so the pieces of glass would melt and fill the mould. 

I weighed out the glass for my rose mould, using a glass:wax ratio of 2.55:1. my wax weighed 87g, and so i calculated that i would need 221 grams of glass. I weighed out 225, in case some of the glass stuck to the inside of the reservoir instead of all flowing into the mould. These were also put into a kiln, on ceramic fibre paper in case any of the glass overflowed and dripped onto the kiln floor.


Sunday, 6 October 2013

Glasswork: Steaming and carving the moulds

To create the mould for my rose, i had to get all of the wax out of the plaster to make the cavity i would then put glass in. I did this by putting the mould on top of a steamer (the same kind you use to take wallpaper off) which melts the wax, because steam is 100 degrees. the heat makes the wax liquid, which then runs out of the mould. this is one reason not to have any pieces sticking out so the wax can't get out, and the glass can't get in. any leftover wax could distort the shape and discolour the glass, so it is important to make sure there is no wax left in the mould.
 The wax came out of the mould and solidified underneath as it cooled.
 when no more wax was coming out of the mould, I flushed it out with hot water from the kettle, then cold. the hot water melted any remaining wax, and the cold water made it solidify again and float to the surface to be poured away. I repeated this until no more wax came out. I then put it in the drying cupboard.

I then carved into a plaster block to create a negative mould. i had to make sure it was deep enough to not snap if it were cast in glass. i used a leaf as my design, but simplified it slightly to make it easier for the glass to get into all the corners.


i carved the veins, so these will be stuck out when i cast it in glass.

Thursday, 17 January 2013

Metalwork: Recycling a cat food can

 I decided to use empty washed out cat-food cans, because we have four cats, so the cans are readily available  and are always just put in the recycling bin, so I wanted to use them to make something new. After looking at leaves, I decided to use the ridges that go around the can for the veins of the leaves. I cut diagonally across the ridges of the can, then cut out the two halves of the leaf. 
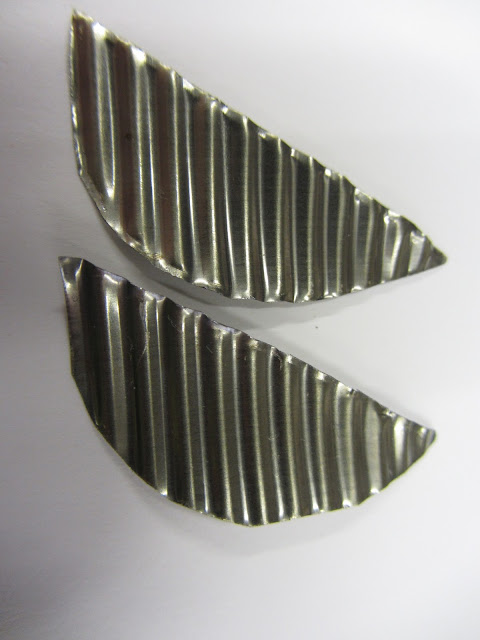
I used a punch and a hammer to make holes in either side of the leaf, then used wire to attach them together neatly. I made three leaves in this way, and when they are all put together I think they would make a nice necklace, or brooch.


 Next I used the base of the can, which is thicker than the sides and has circular grooves, and put enamel powder into the centre circle and put it into the enamel kiln.
 When I took it out and it cooled, I made a copper wire flower shape, based on the centre of the pink flower, and put it onto the enamel, then put it back into the kiln to melt the enamel again, so the wire would sink into it and would hold  it firmly. I then used white enamel powder around the wire part, so a little bit of the yellow was still visible through it.

 I wanted to also colour the outer grooves, but not to cover up the whole of the surface, because I wanted it to have the mix of old metal with new enamel. I used white and red enamel because there was no pink, and think it has worked well. I have not used enamel before this, and think my outcome is very successful in showing the mix of old with new, and also making a new object from an old one. This could be used as a decorative object on its own, or could be made into a brooch or necklace.

I then tried to make something from a can base that didn't include using any new materials, so I decided to use some paper clips and a drawing pin, to add to the can as decoration. I think this worked well because all of the materials are shiny metal, and are designed to be functional not decorative so using them in this way is interesting. I have bent the paper clips so they look like the flower petals, and also used shears to cut the edge into petal shapes.