
Showing posts with label hidden pattern. Show all posts
Showing posts with label hidden pattern. Show all posts
Wednesday, 10 July 2013
Hiding words in pattern
In thinking about ways to put pattern into pattern, so that there was a hidden pattern which was not very noticeable against the obvious pattern, I started thinking of putting words or messages into my pieces, possibly using code to hide them. after looking at codes like morse code, I found the braille alphabet. Braille uses raised dots, each letter a different combination of dots, in a 2 x 3 grid. I thought I could use this alphabet with my folded squares, and make the letters using different coloured squares or a different material.


Metalwork: More enamel.


Thursday, 30 May 2013
Ceramics: Creating pattern through repetition


Textile and mixed media: repeated diamonds.


Wednesday, 15 May 2013
Metalwork: Making a copper bangle


Tuesday, 16 April 2013
Ceramics: Natural pattern.
After a visit to West Midlands Safari Park, I started to think how pattern is used to hide animals in their natural habitat, and started thinking about how I could hide things in pattern, instead of hiding the pattern itself. I think this will make my jewellery a lot more patterned and decorative, but also keep the idea of hiding something in it, so what you see at first is not all that it is, and the jewellery will be more special and valuable to the person who owns it. I first looked at the pattern on zebras, and how this helps them to hide and be protected from predators I then thought how a zebra shape could be hidden in a patterned background, carrying on the stripes outwards.
I used a photo of a zebra I took at the safari park as a guide for the outline and stripes, then continued the stripes out, up to the edge of the piece of clay. when the clay was a bit drier, I carefully took the zebra shape out, then stuck the outside part onto another piece of flat clay with slip.

This made a base which the zebra fitted in, and could be taken out like a jigsaw piece. I am planning to fire them with the zebra in, using a powder to stop it from sticking. Because clay shrinks as it dries, when it is fired, the thicker base part may shrink at a different rate to the zebra, so it may not fit exactly, so by leaving the zebra in it, I am hoping that this will be less likely.

 I have made two small tunnels on the back, which will hold the weight of the piece, which I hope to use as the centre piece of a necklace. I have left a gap between them, to leave space for a small metal clip, which will hold the zebra in place. I hope to use oxides when it has been fired, to make the indented stripes black, and leave the more prominent parts white.

I used a photo of a zebra I took at the safari park as a guide for the outline and stripes, then continued the stripes out, up to the edge of the piece of clay. when the clay was a bit drier, I carefully took the zebra shape out, then stuck the outside part onto another piece of flat clay with slip.

This made a base which the zebra fitted in, and could be taken out like a jigsaw piece. I am planning to fire them with the zebra in, using a powder to stop it from sticking. Because clay shrinks as it dries, when it is fired, the thicker base part may shrink at a different rate to the zebra, so it may not fit exactly, so by leaving the zebra in it, I am hoping that this will be less likely.


Tuesday, 2 April 2013
Metalwork: Making a brooch.
I wanted to make my piece of patterned copper 'wall' into a brooch, without just shoving a pin on it. I decided I wanted most of the pattern to be on the inside, so only the wearer knew it was there, and to keep the outside fairly minimal. I thought of what would be on a wall, like railings, and because the pattern was similar to patterns of paving slabs I have looked at, I also looked at what would be on floors, like footprints. I decided finally on drainpipes, because that would be a decorative way of attaching it to something, because a pin or a few pins could go into the pipes to hold it on. I also went out and did some observational sketches of how pipes fitted together, and how they were attached to the wall, to get ideas of how I could arrange the pipes on my brooch.


I decided to have one straight piece of pipe, and one bent, so I could have one long pin that would go all the way through the pipe, and not fall out. I soldered a bent piece of wire to the straight piece of pipe (it is solid wire not pipe because it doesn't need to hold the pin, and wire is easier to bend without miss-shaping it) and then made small loops from thinner wire, and used lead solder to join them on without melting the previous soldering.

 After polishing it in the tumbler, I super glued the brass pieces on so they would stay still while I was drilling, and centre punched each side of each brass piece so I knew where to drill.
 I drilled the holes, then neatened them and made them a little bit bigger so the rivets would go through.
 The rivets are decorative on the other side, so it will still look nice when worn so that the main pattern is hidden.
 I wanted the pin to go through the pipe, and hold on to the garment at both the top and bottom, so it would hold on securely.
 I used a piece of wire, and melted the end so there was a small blob, which would stop it going through the fabric. I also curved the wire slightly, so the tension would keep it held in the right place.
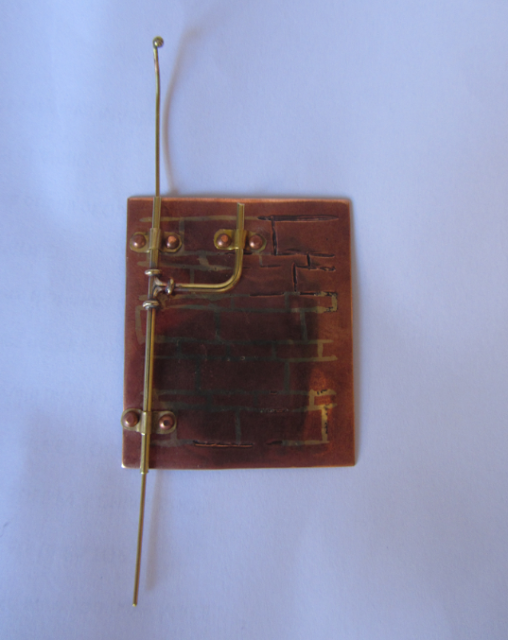


I decided to have one straight piece of pipe, and one bent, so I could have one long pin that would go all the way through the pipe, and not fall out. I soldered a bent piece of wire to the straight piece of pipe (it is solid wire not pipe because it doesn't need to hold the pin, and wire is easier to bend without miss-shaping it) and then made small loops from thinner wire, and used lead solder to join them on without melting the previous soldering.


Sunday, 17 March 2013
Ceramics: Using pattern in clay.
I wanted to try making some relief patterns in clay, from my photographs and observational sketching. I made small pieces, with the intention of using them to test out different glazes, and see how they work on the textured surfaces, but also to test how the patterns look on a very small scale, with a view of possibly using ceramic pieces in jewellery.

I made two pieces using a weaving technique with strips of clay, based on both the pattern of woven fabric, and also based on a pattern I found inside an envelope. I then made a piece with the pattern of a cabbage leaf, with parts that were pressed in to create depressions, and also adding strips of clay to create veins. My last two flat pieces were based on patterns from floors, one a paving slab, and the other a mosaic floor.


Subscribe to:
Posts (Atom)